Examples#
Each example below is a complete, runnable report from the
Examples/ directory.
Every preview on this page is the actual rendered PDF — produced by running:
ym convert report.yml
Grab any example folder, tweak the YAML, and re-render to see your changes.
Simple example#
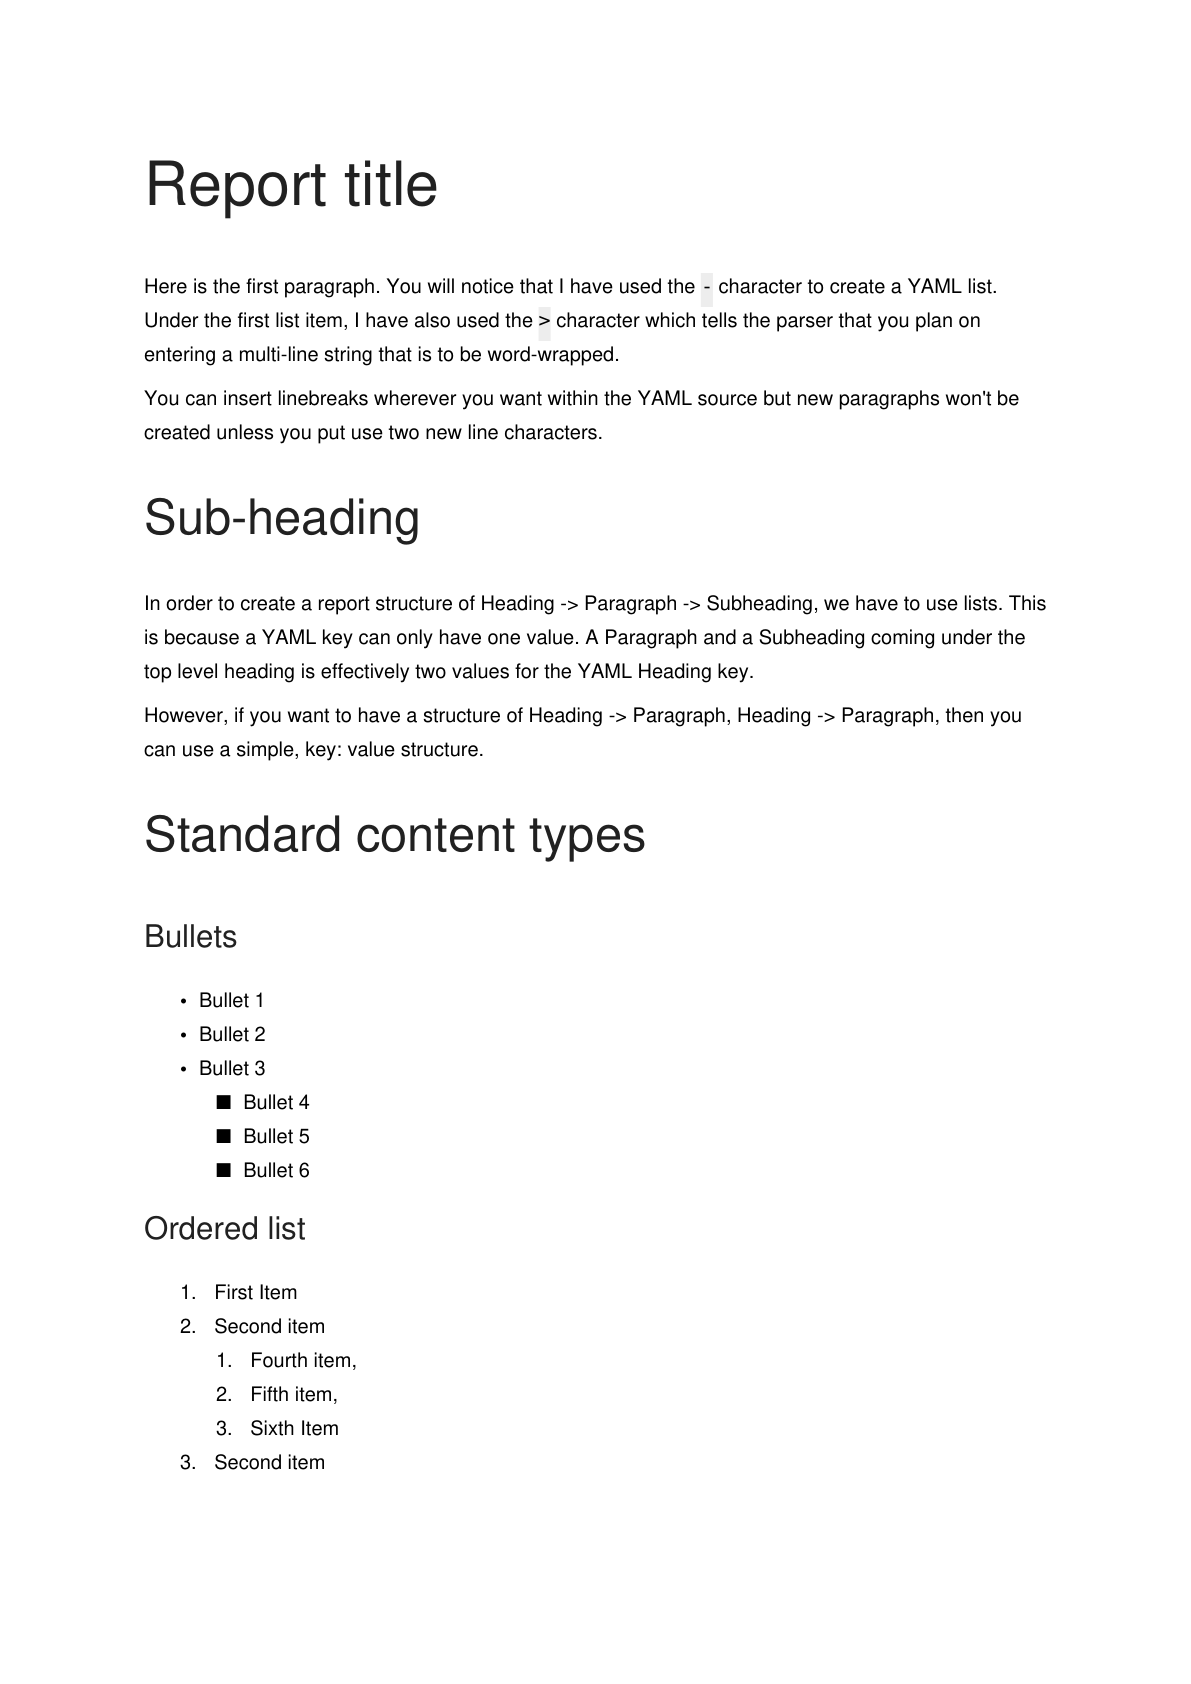
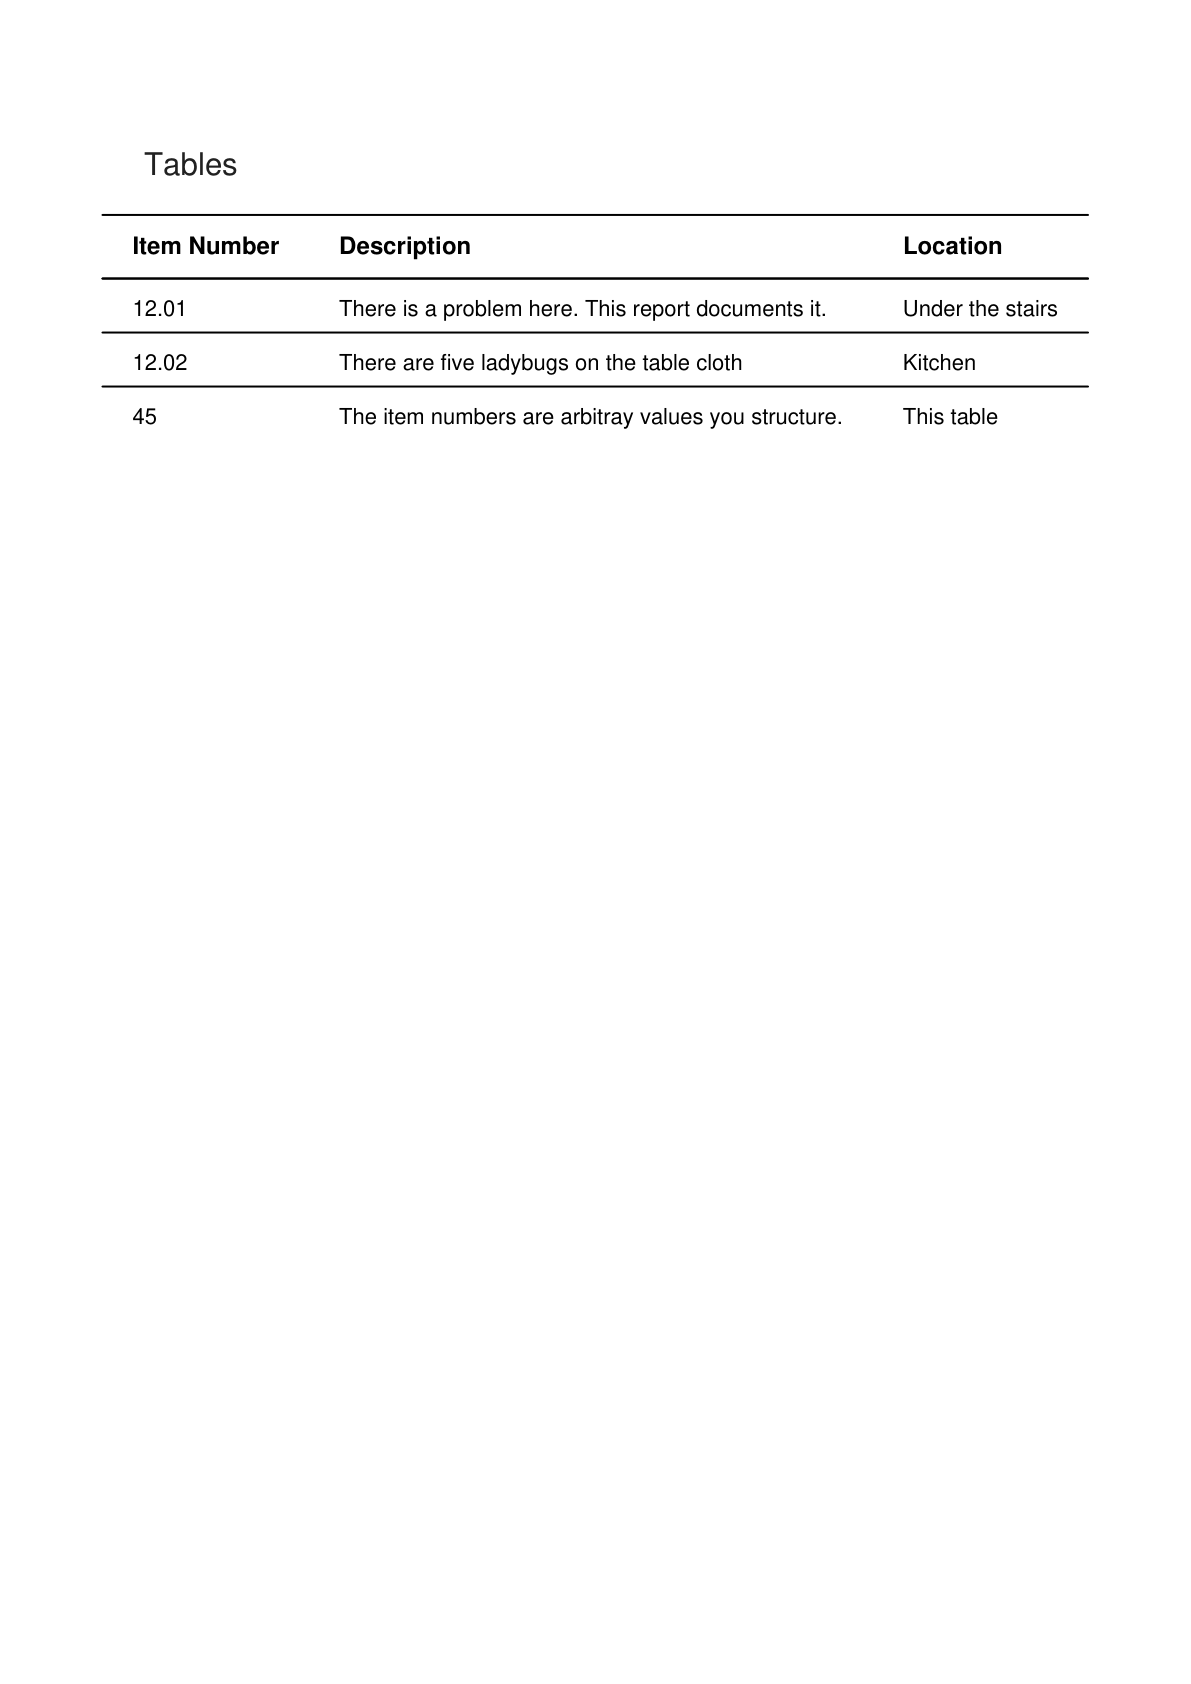
The essentials: headings from keys, word-wrapped paragraphs, a sub-heading, nested bullets, an ordered list, and a table. Start here, then read Document structure.
Report title:
  - >
    Here is the first paragraph. You will notice that I have used the `-` character to create
    a YAML list. Under the first list item, I have also used the `>` character which tells
    the parser that you plan on entering a multi-line string that is to be word-wrapped.

    You can insert linebreaks wherever you want within the YAML
    source but new paragraphs won't be created unless you put use two new line characters.

  - Sub-heading: >
     In order to create a report structure of Heading -> Paragraph -> Subheading, we have to
     use lists. This is because a YAML key can only have one value. A Paragraph and a Subheading
     coming under the top level heading is effectively two values for the YAML Heading key.

     However, if you want to have a structure of Heading -> Paragraph, Heading -> Paragraph, then
     you can use a simple, key: value structure.

  - Standard content types:
    - Bullets:
        _ul:
          - Bullet 1
          - Bullet 2
          - Bullet 3
          - - Bullet 4
            - Bullet 5
            - Bullet 6
    - Ordered list:
        _ol:
          - First item
          - Second item
          - - Nested first
            - Nested second
            - Nested third
    - Tables:
      - Item Number: 12.01
        Description: There is a problem here. This report documents it.
        Location: Under the stairs
      - Item Number: 12.02
        Description: There are five ladybugs on the table cloth
        Location: Kitchen
      - Item Number: 45
        Description: The item numbers are arbitray values you structure.
        Location: This table
Page 1
Page 2
Document configuration#
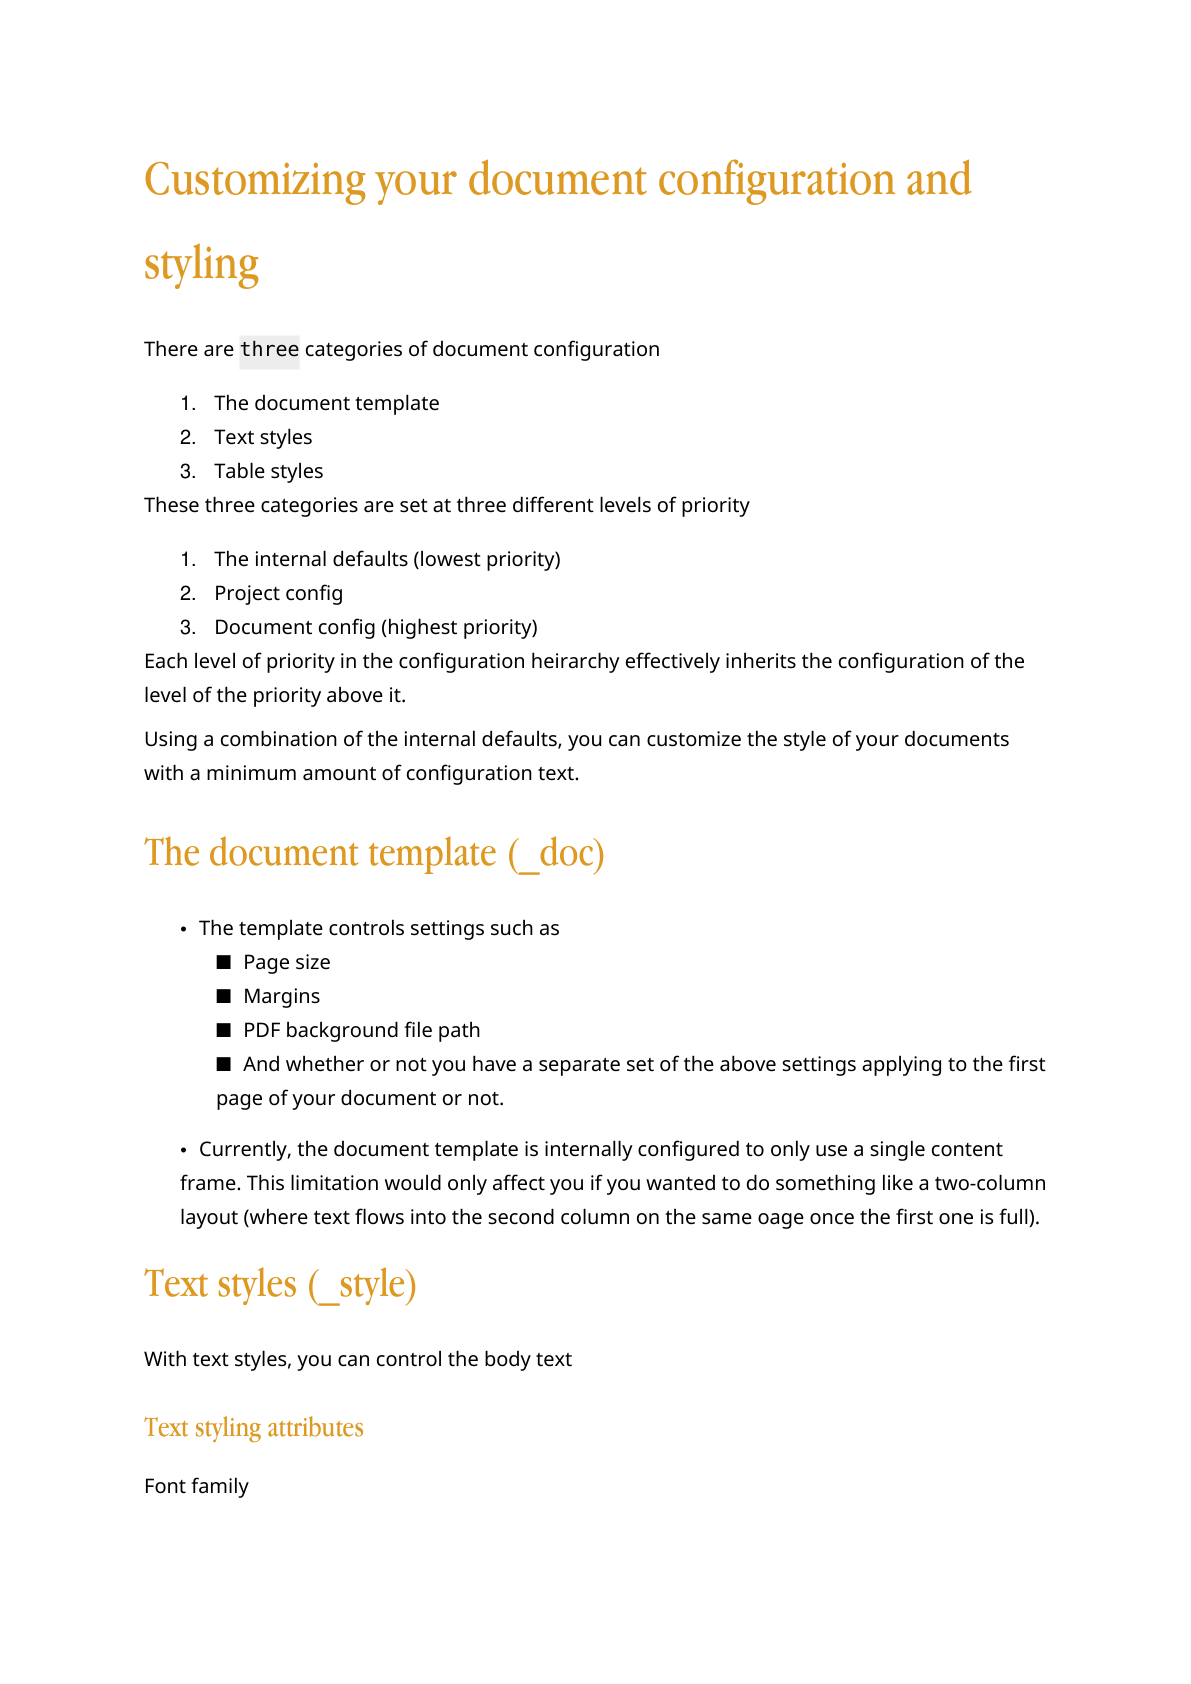
Override the body font, heading font, heading colour, and typographic ratio with a _style
block in the document front matter. See Configuration.
_style:
  body:
    font: NotoSans
  headings:
    font: AppleGaramond
    ratio: minor third
    color: "#dd9922"

Customizing your document configuration and styling:
  - >
    There are `three` categories of document configuration
  - _ol:
      - The document template
      - Text styles
      - Table styles

  - >
    These three categories are set at three different levels of priority
  - _ol:
      - The internal defaults (lowest priority)
      - Project config
      - Document internal config (highest priority)

  - >
    Each level of priority in the configuration heirarchy effectively inherits the configuration of the level of priority above it.

    Using a combination of configuration levels, you can customize the style of your documents with a minimum amount of configuration text.

  - The document template (_doc):
    - >
      The `_doc` configuration controls the document-wide page size and orientation, along with
      one or more named `page templates`. Each page template controls settings such as
    - - Margins
      - PDF background file path

    - >
      The first page template listed is the one your document starts on. Within your report you
      can switch between page templates using the `_pagebreak` block (pass it the name or index of
      the template to use for the following pages) or the `_nextpagetemplate` block (which arms the
      template to switch to at the next page break).

    - >
      Currently, the document template is internally configured to only use a single content frame. This limitation would only affect you if you wanted to do something like a two-column layout (where text flows into the second column on the same page once the first one is full).

  - Text styles (_style):
    - >
      With text styles, you can control the body text
    - Text styling attributes:
        _ul:
          - Font family
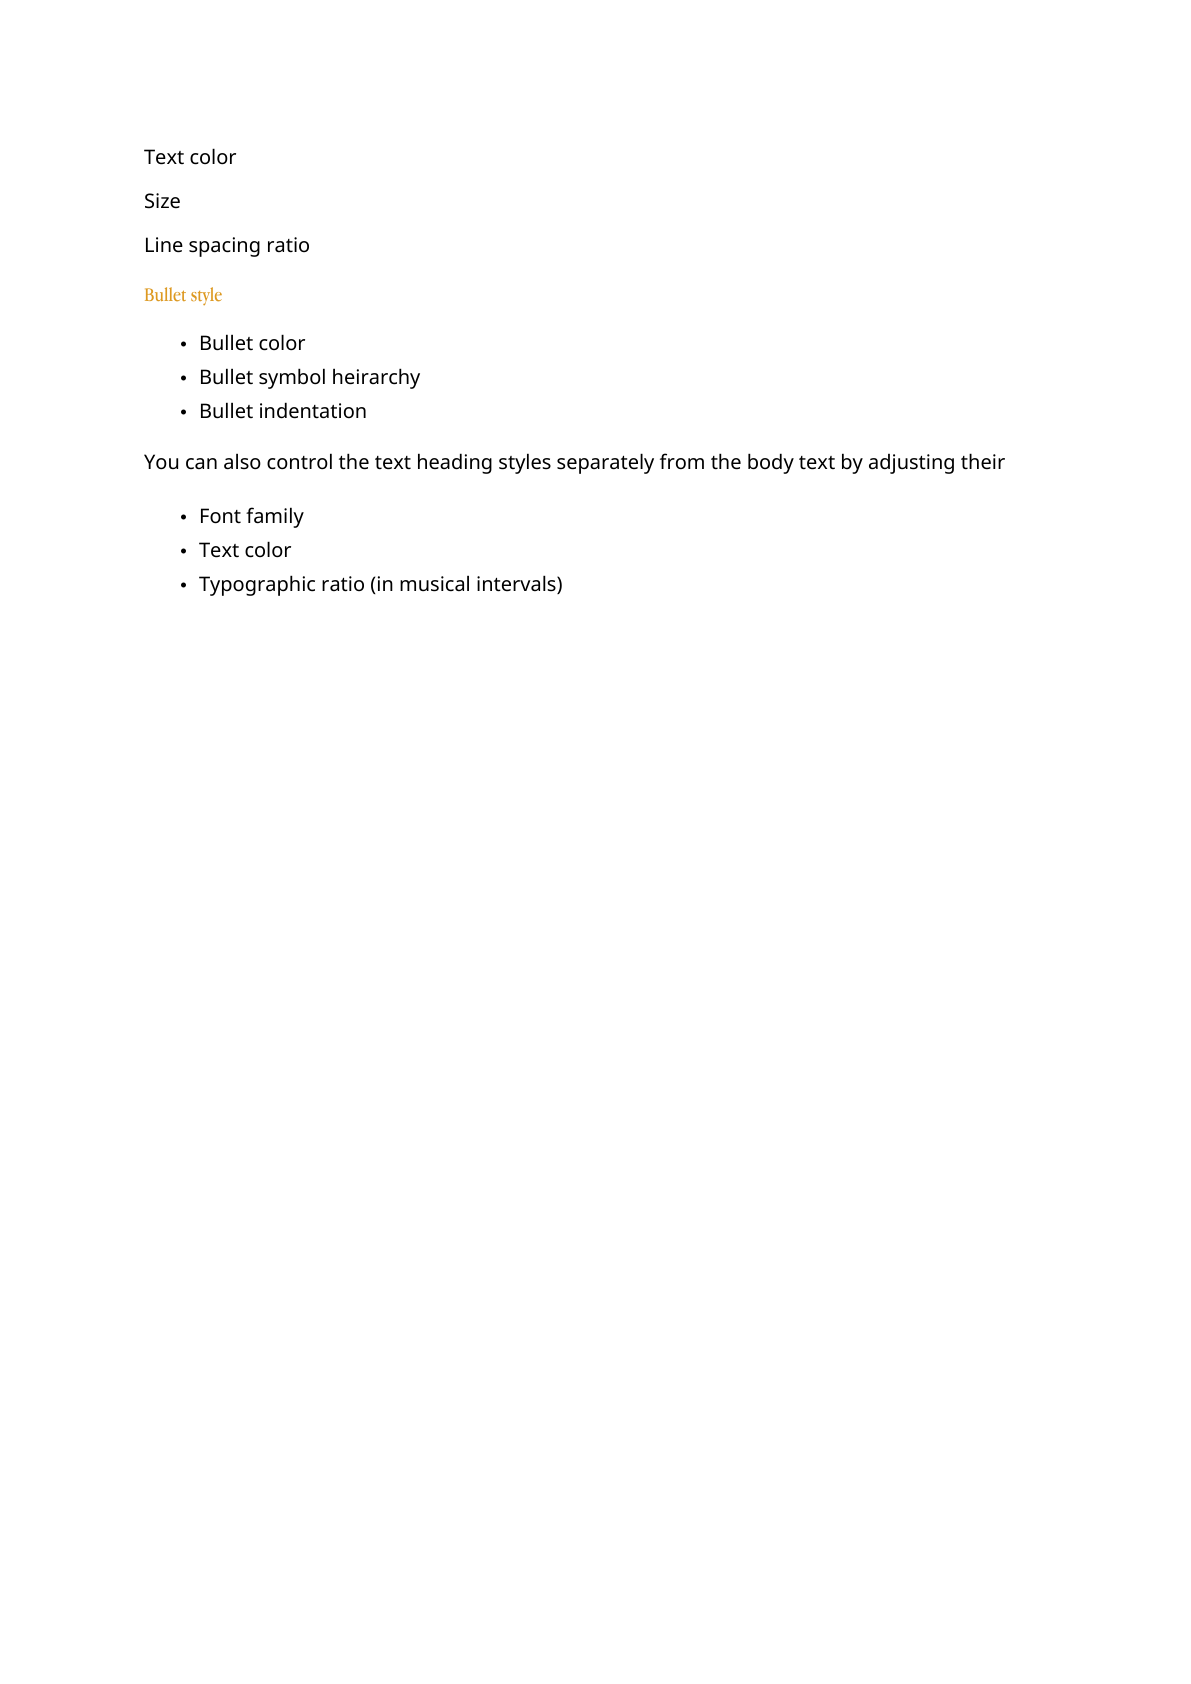
          - Text color
          - Size
          - Line spacing ratio
          - "Bullet style:"
          - - Bullet color
            - Bullet symbol heirarchy
            - Bullet indentation

    - >
      You can also control the text heading styles separately from the body text by adjusting their

    - _ul:
        - Font family
        - Text color
        - Typographic ratio (in musical intervals, e.g. "minor second" or "major third")
        - Alignment (left, center, right, justify) and underline

    - >
      Beyond the default `body` and `headings`, you can define named `styles` — alternate text
      families you switch between within the document using the `_textstyle` block. Each named
      style is a sparse override that inherits everything you don't change from the defaults.
  - Table styles (_tablestyle):
    - >
      You can control how your tables are displayed by modifying the table style. With the _tablestyle key, you can control
    - _ul:
        - "Table header:"
        - - background (color)
          - gridlines (above, below, between)
          - "text: font, size, color"
        - "Table rows:"
        - - even (rows, background color)
          - odd (rows, background color)
          - gridlines (above, below, between)
          - "text: font, size, color"
Page 1
Page 2
Scoped text styles#
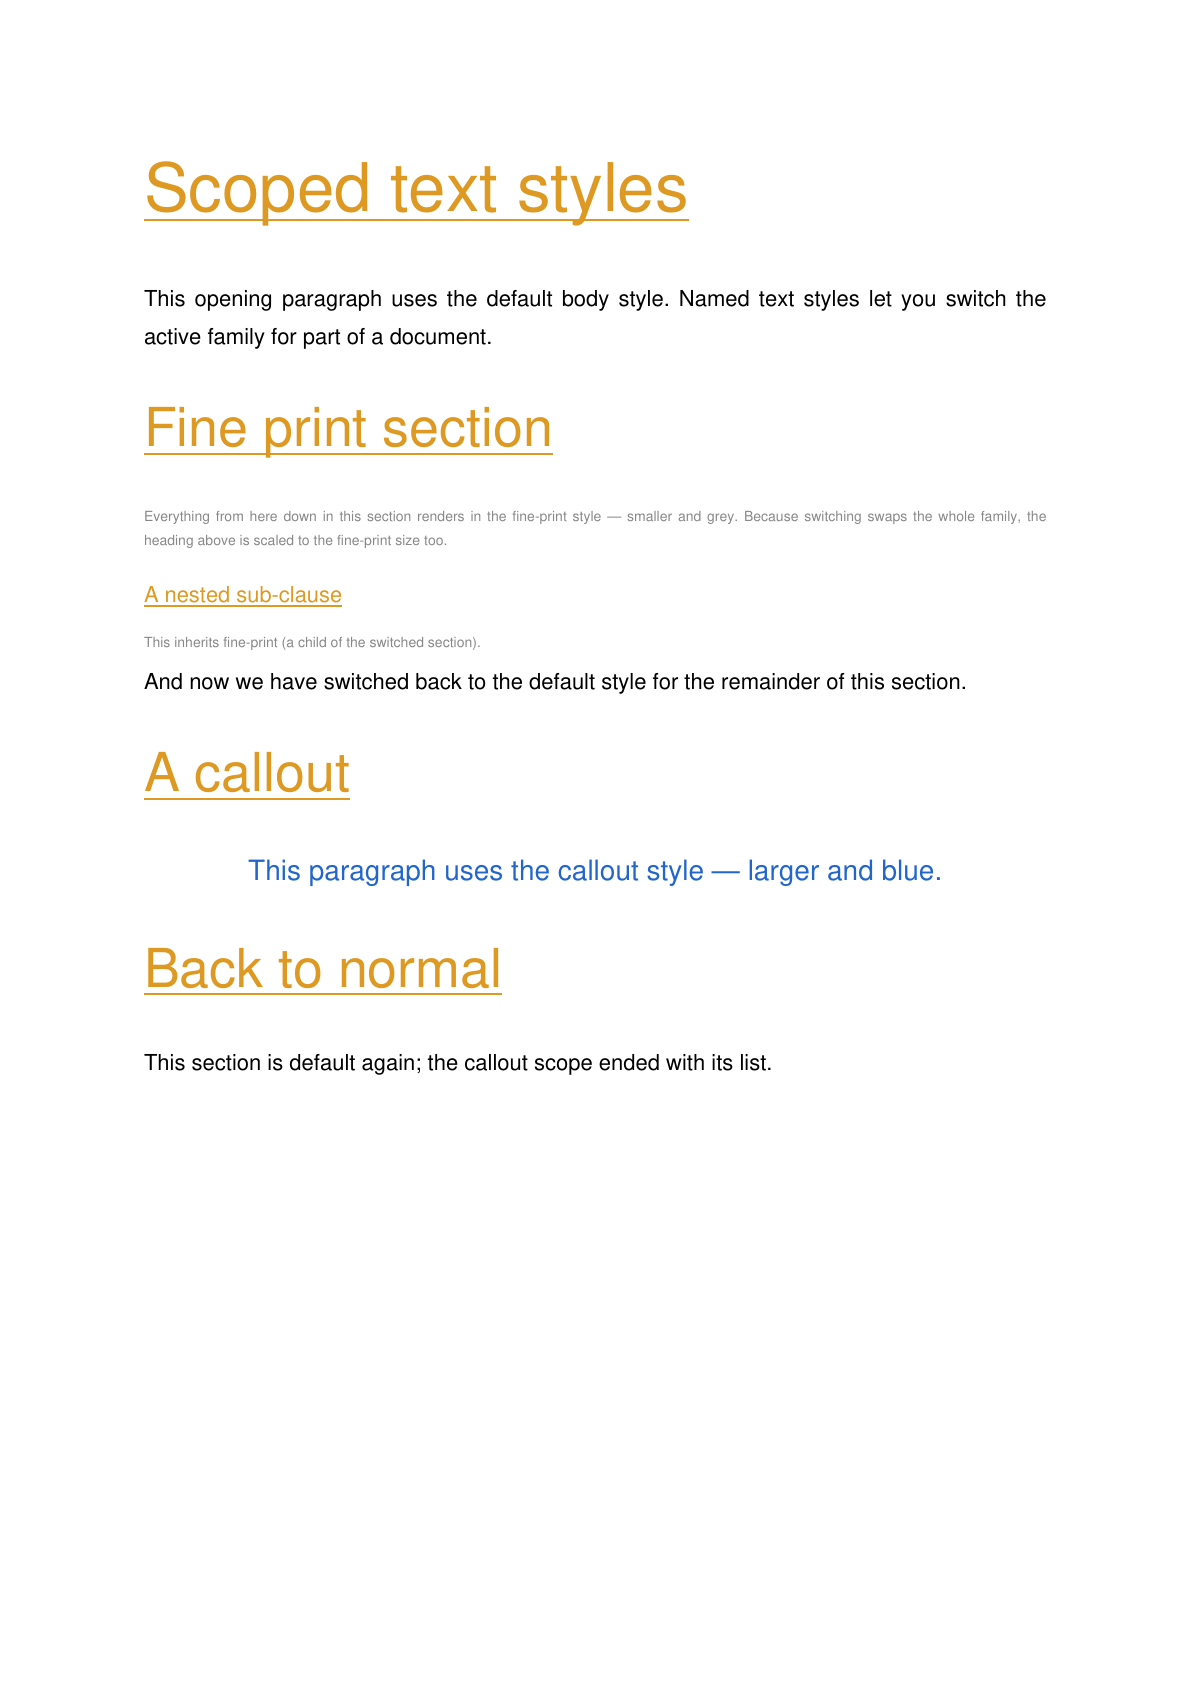
Define named text styles under _style.styles, then switch the active family part-way through
the document with the _textstyle block. Here a fine-print style (smaller, grey) and a
callout style (larger, blue, centred) are switched in and out — each swap restyles the body,
headings, and lists that follow it, and reverts when the section ends. See
Configuration → Named text styles.
_style:
  body:
    font: Helvetica
    size: 11
    align: justify             # left | center | right | justify
  headings:
    font: Helvetica
    ratio: major third
    color: "#dd9922"
    underline: true            # underline all headings
  styles:                      # named styles, each inherits from body/headings
    fine-print:
      body:
        size: 7
        color: "#888888"
    callout:
      body:
        size: 14
        color: "#2266cc"
        align: center          # this style centers its paragraphs

Scoped text styles:
  - >
    This opening paragraph uses the default body style. Named text styles let you switch
    the active family for part of a document.

  - Fine print section:
    - _textstyle: fine-print
    - >
      Everything from here down in this section renders in the fine-print style — smaller
      and grey. Because switching swaps the whole family, the heading above is scaled to
      the fine-print size too.
    - A nested sub-clause:
      - This inherits fine-print (a child of the switched section).
    - _textstyle: default
    - >
      And now we have switched back to the default style for the remainder of this section.

  - A callout:
    - _textstyle: callout
    - >
      This paragraph uses the callout style — larger and blue.

  - Back to normal:
    - >
      This section is default again; the callout scope ended with its list.
Document variables#
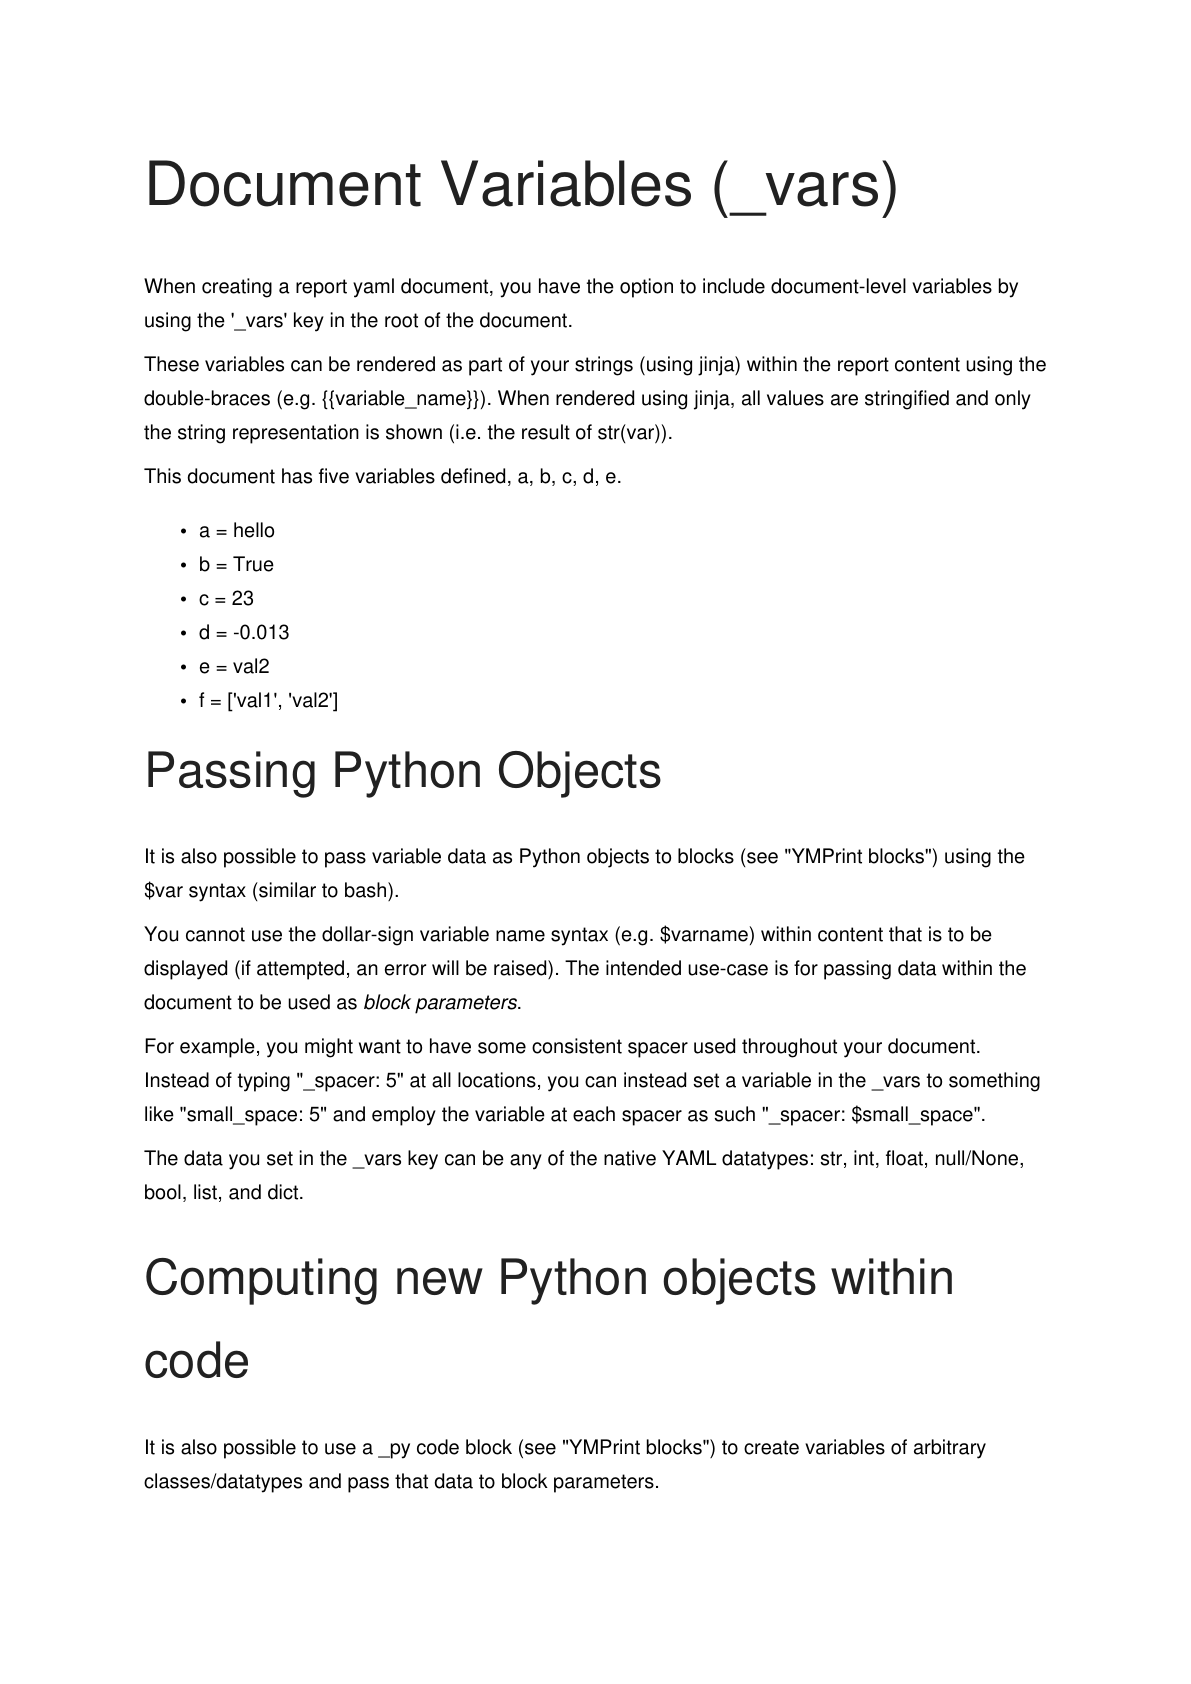
Define _vars, render them into text with Jinja ({{ "{{var}}" }}), and reach into nested
values. See Variables.
_vars:
  a: "hello"
  b: true
  c: 23
  d: -0.013
  e: {'key': 'value', 'key2': 'val2'}
  f: ['val1', 'val2']
Document Variables (_vars):
  - >
    When creating a report yaml document, you have the option to include document-level variables by using the
    '_vars' key in the root of the document.

    These variables can be rendered as part of your strings (using jinja) within the report content using the double-braces
    (e.g. {% raw %}{{variable_name}}{% endraw%}). When rendered using jinja, all values are stringified and only the string
    representation is shown (i.e. the result of str(var)).

    This document has five variables defined, a, b, c, d, e.
  - _ul:
      - a = {{a}}
      - b = {{b}}
      - c = {{c}}
      - d = {{d}}
      - e = {{e.key2}}
      - f = {{f}}
  - Passing Python Objects: >
      It is also possible to pass variable data as Python objects to blocks (see "YMPrint blocks") using the $var syntax (similar to bash).

      You cannot use the dollar-sign variable name syntax (e.g. $varname) within content that is to be displayed (if attempted, an
      error will be raised). The intended use-case is for passing data within the document to be used as <i>block parameters</i>.

      For example, you might want to have some consistent spacer used throughout your document. Instead of typing "_spacer: 5" at all
      locations, you can instead set a variable in the _vars to something like "small_space: 5" and employ the variable at each spacer
      as such "_spacer: $small_space".

      The data you set in the _vars key can be any of the native YAML datatypes: str, int, float, null/None, bool, list, and dict.
  - Computing new Python objects within code: >
      It is also possible to use a _py code block (see "YMPrint blocks") to create variables of arbitrary classes/datatypes and pass
      that data to block parameters.

      A ready example of this would be the _matplotfig block which has a "fig" parameter that expects a matplotlib figure.

      You would first generate the figure in a _py block and assign the generated figure to a variable. You would then use the
      dollar-sign syntax to pass that computed variable into the "fig" parameter of the _matplotfig code block (see YMPrint blocks
      for details.)
Page 1

Page 2
PDF backgrounds#
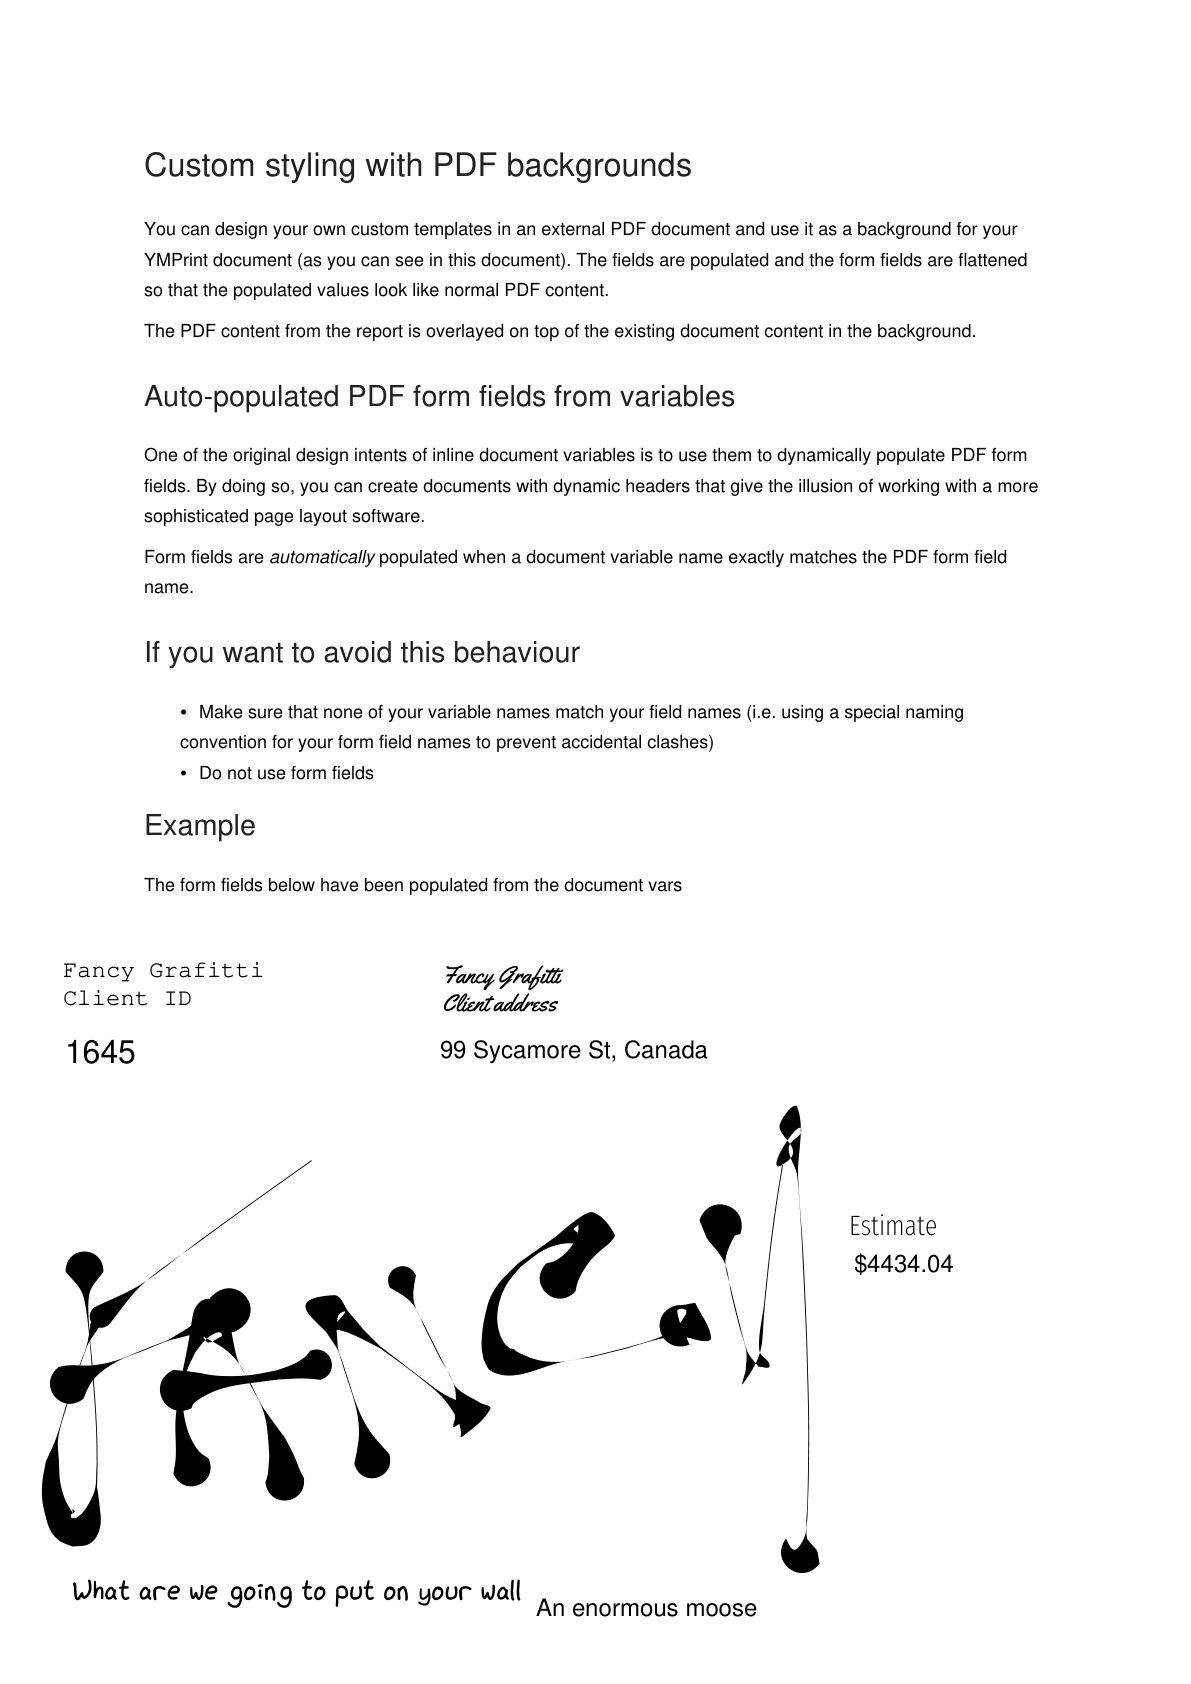
Overlay the document onto a designed PDF template and auto-populate its form fields from
_vars (here: field_a, field_b, field_c, field_d). See
PDF backgrounds.
_doc:
  templates:
    default:
      margins:
        top: 72.0
        left: 72.0
        right: 72.0
        bottom: 72.0
      background:
        filepath: background.pdf
        relative-to: source
_vars:
  field_a: 1645
  field_b: 99 Sycamore St, Canada
  field_c: $4434.04
  field_d: An enormous moose
_style:
  body:
    size: 9
  headings:
    ratio: major second
Custom styling with PDF backgrounds:
  - >
    You can design your own custom templates in an external PDF document and use it as a background for your YMPrint document
    (as you can see in this document). The fields are populated and the form fields are flattened so that the populated values
    look like normal PDF content.

    The PDF content from the report is overlayed on top of the existing document content in the background.

  - Auto-populated PDF form fields from variables: >
      One of the original design intents of inline document variables is to use them to dynamically populate PDF
      form fields. By doing so, you can create documents with dynamic headers that give the illusion of working with
      a more sophisticated page layout software.

      Form fields are _automatically_ populated when a document variable name exactly matches the PDF form field name.

    If you want to avoid this behaviour:
      _ul:
        - Make sure that none of your variable names match your field names (i.e. using a special naming convention for your form field names to prevent accidental clashes)
        - Do not use form fields
    Example: The form fields below have been populated from the document vars
YMPrint blocks#
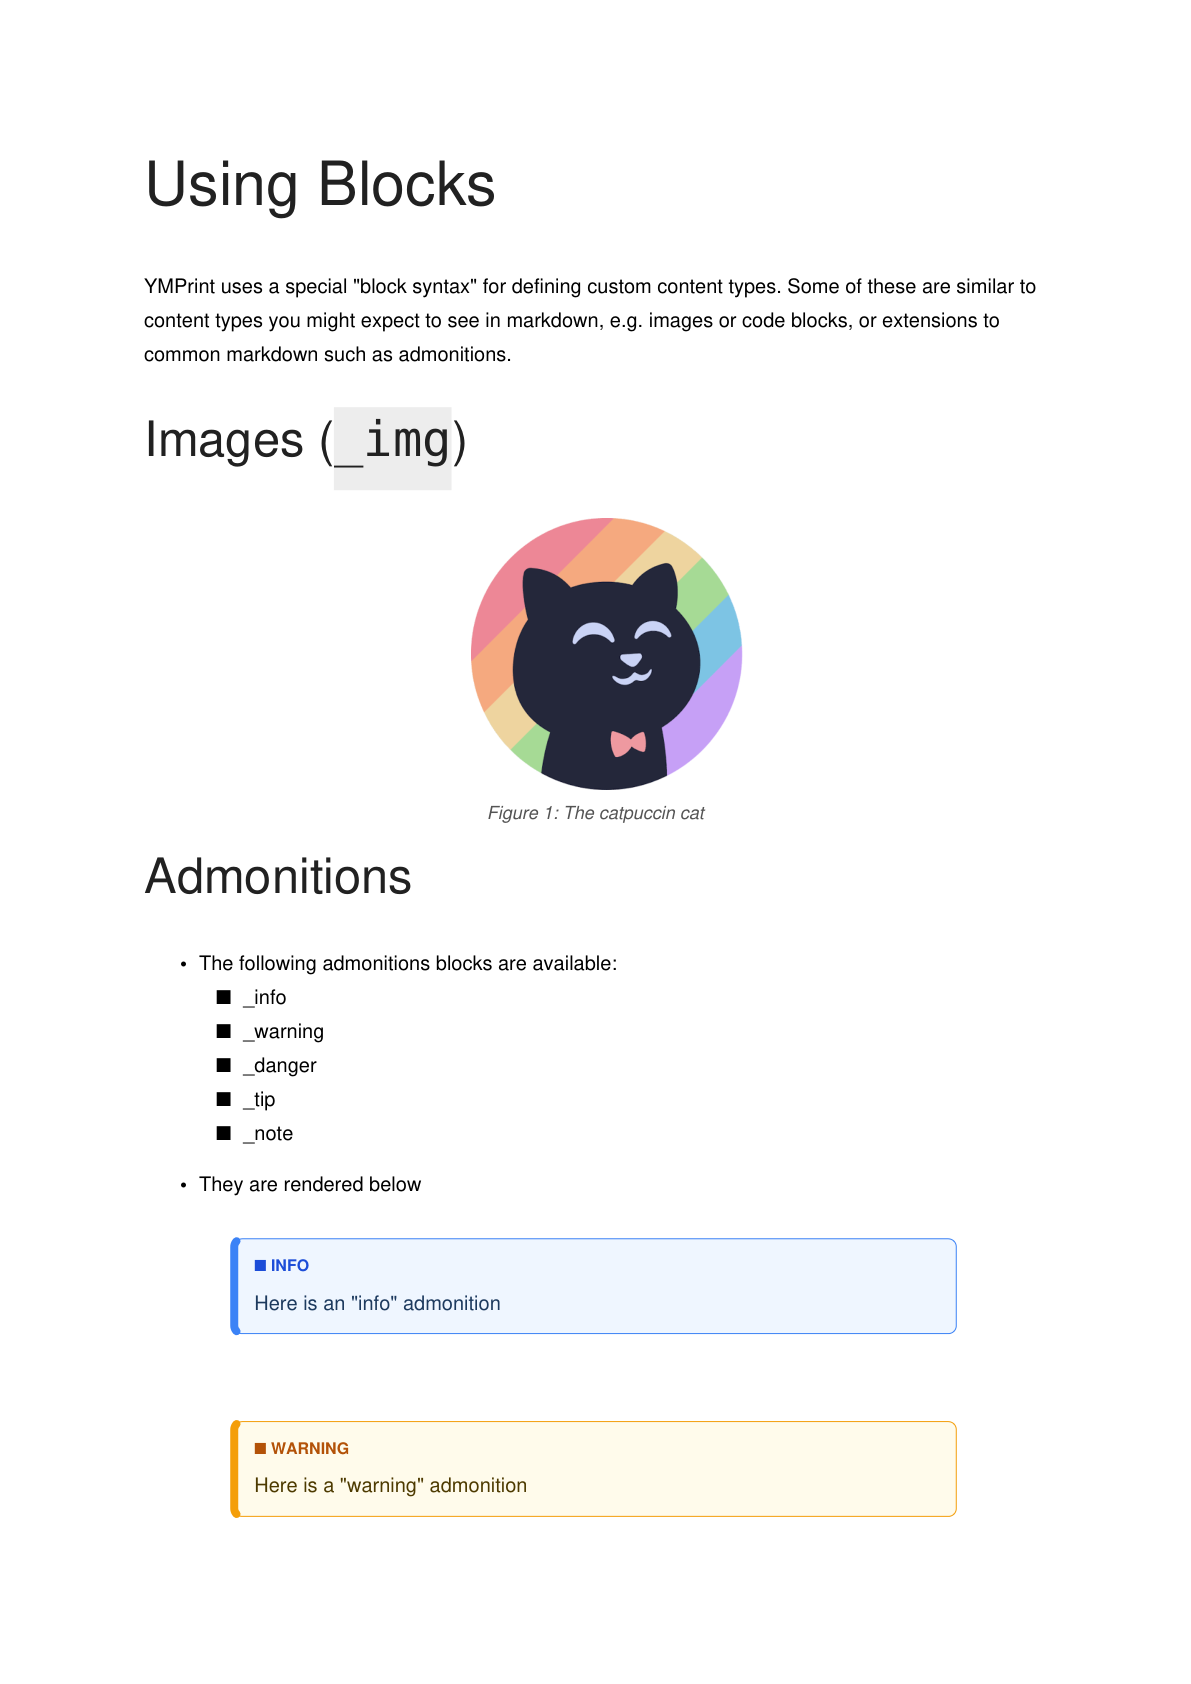
The full block catalogue in one document: images, admonitions, block quotes, page breaks,
horizontal rules, spacers, executable _py, a non-executable _code block, and _loadjson.
See the Blocks reference.
_doc:
  body:
    font: NotoSans
  headings:
    font: NotoSans
Using Blocks:
  - >
    YMPrint uses a special "block syntax" for defining custom content types. Some of these are similar to
    content types you might expect to see in markdown, e.g. images or code blocks, or extensions to common
    markdown such as admonitions.

  - Images (`_img`):
    _img:
      src: catpuccin.png # Either relative or absolute path. Relative paths are relative to the .yml report file.
      caption: "Figure 1: The catpuccin cat"
      scale_ratio: 0.3
  - Admonitions:
    - "The following admonitions blocks are available:"
    - _ul:
        - _info
        - _warning
        - _danger
        - _tip
        - _note
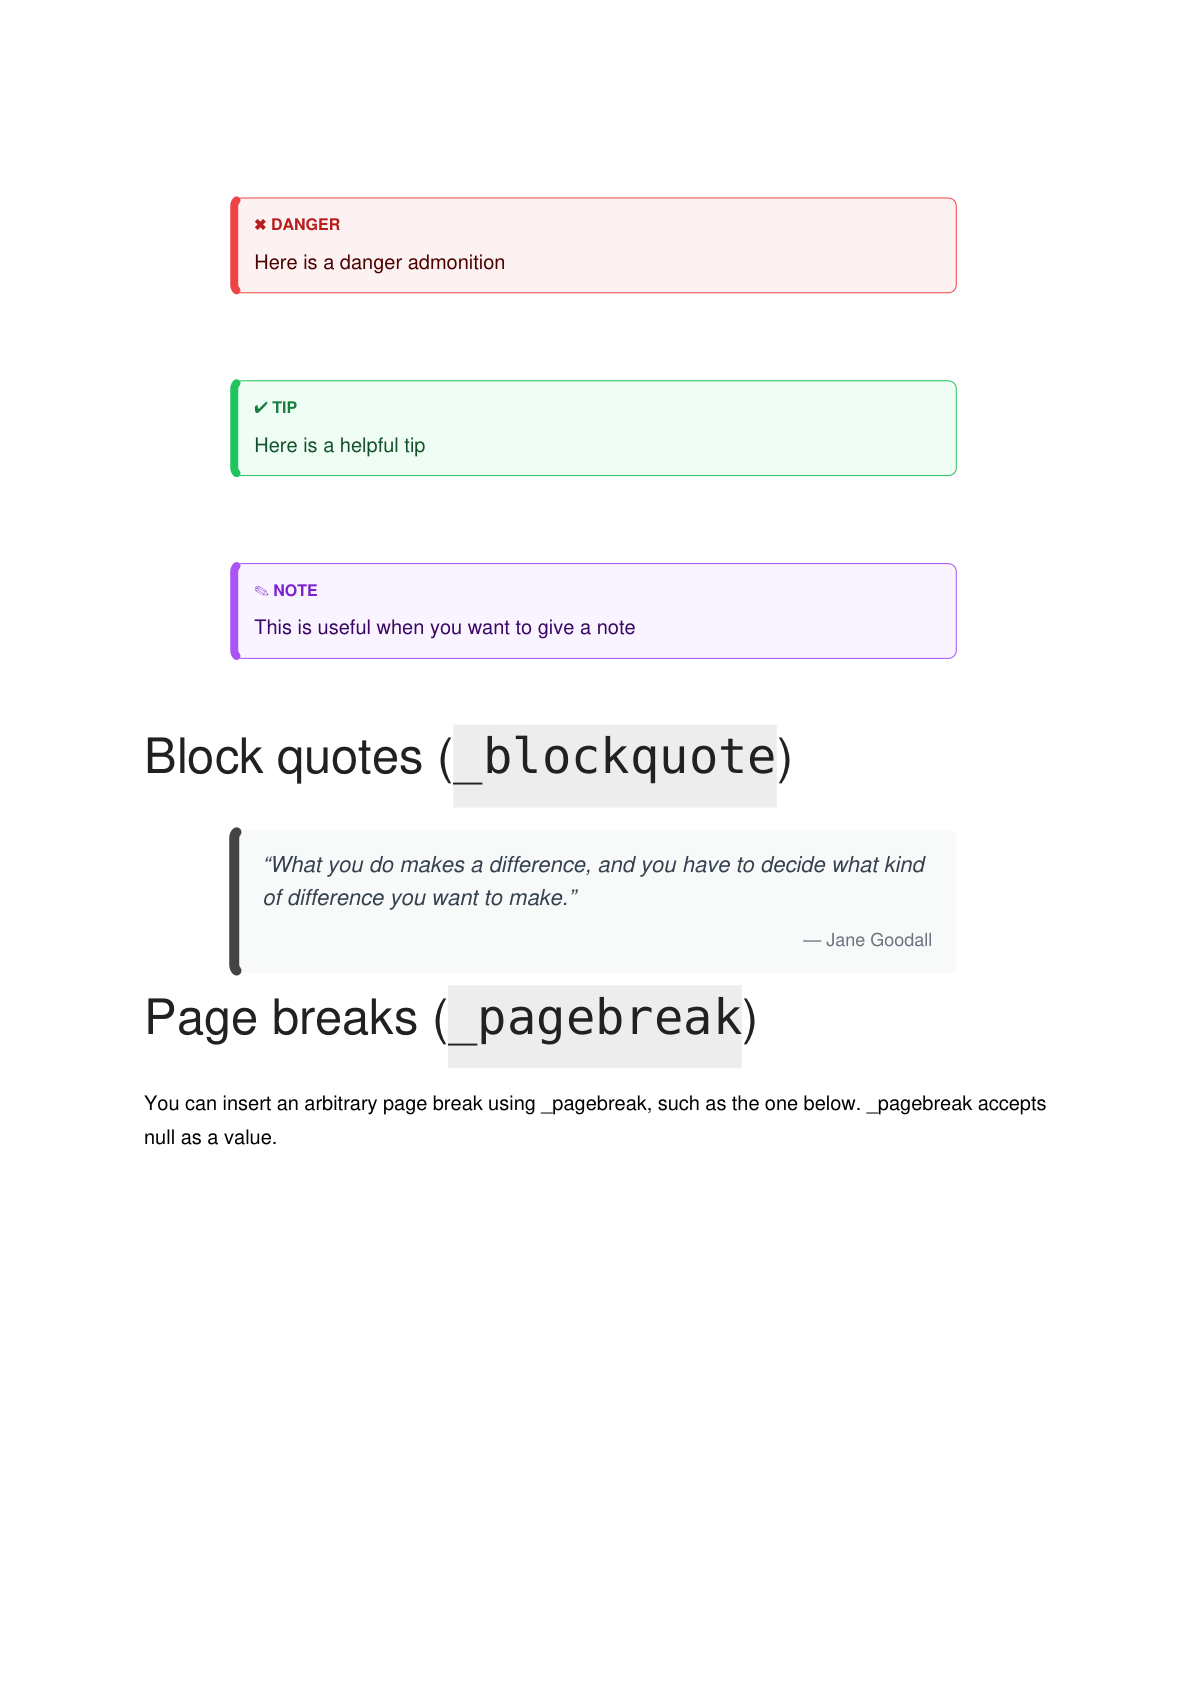
    - They are rendered below

    _info: Here is an "info" admonition
    _warning: Here is a "warning" admonition
    _danger: Here is a danger admonition
    _tip: Here is a helpful tip
    _note: This is useful when you want to give a note
  - Block quotes (`_blockquote`):
    _blockquote:
        quote: “What you do makes a difference, and you have to decide what kind of difference you want to make.”
        attribution: Jane Goodall
  - Page breaks (`_pagebreak`):
    - >
      You can insert an arbitrary page break using _pagebreak, such as the one below. _pagebreak accepts null as a value.
    - _pagebreak:
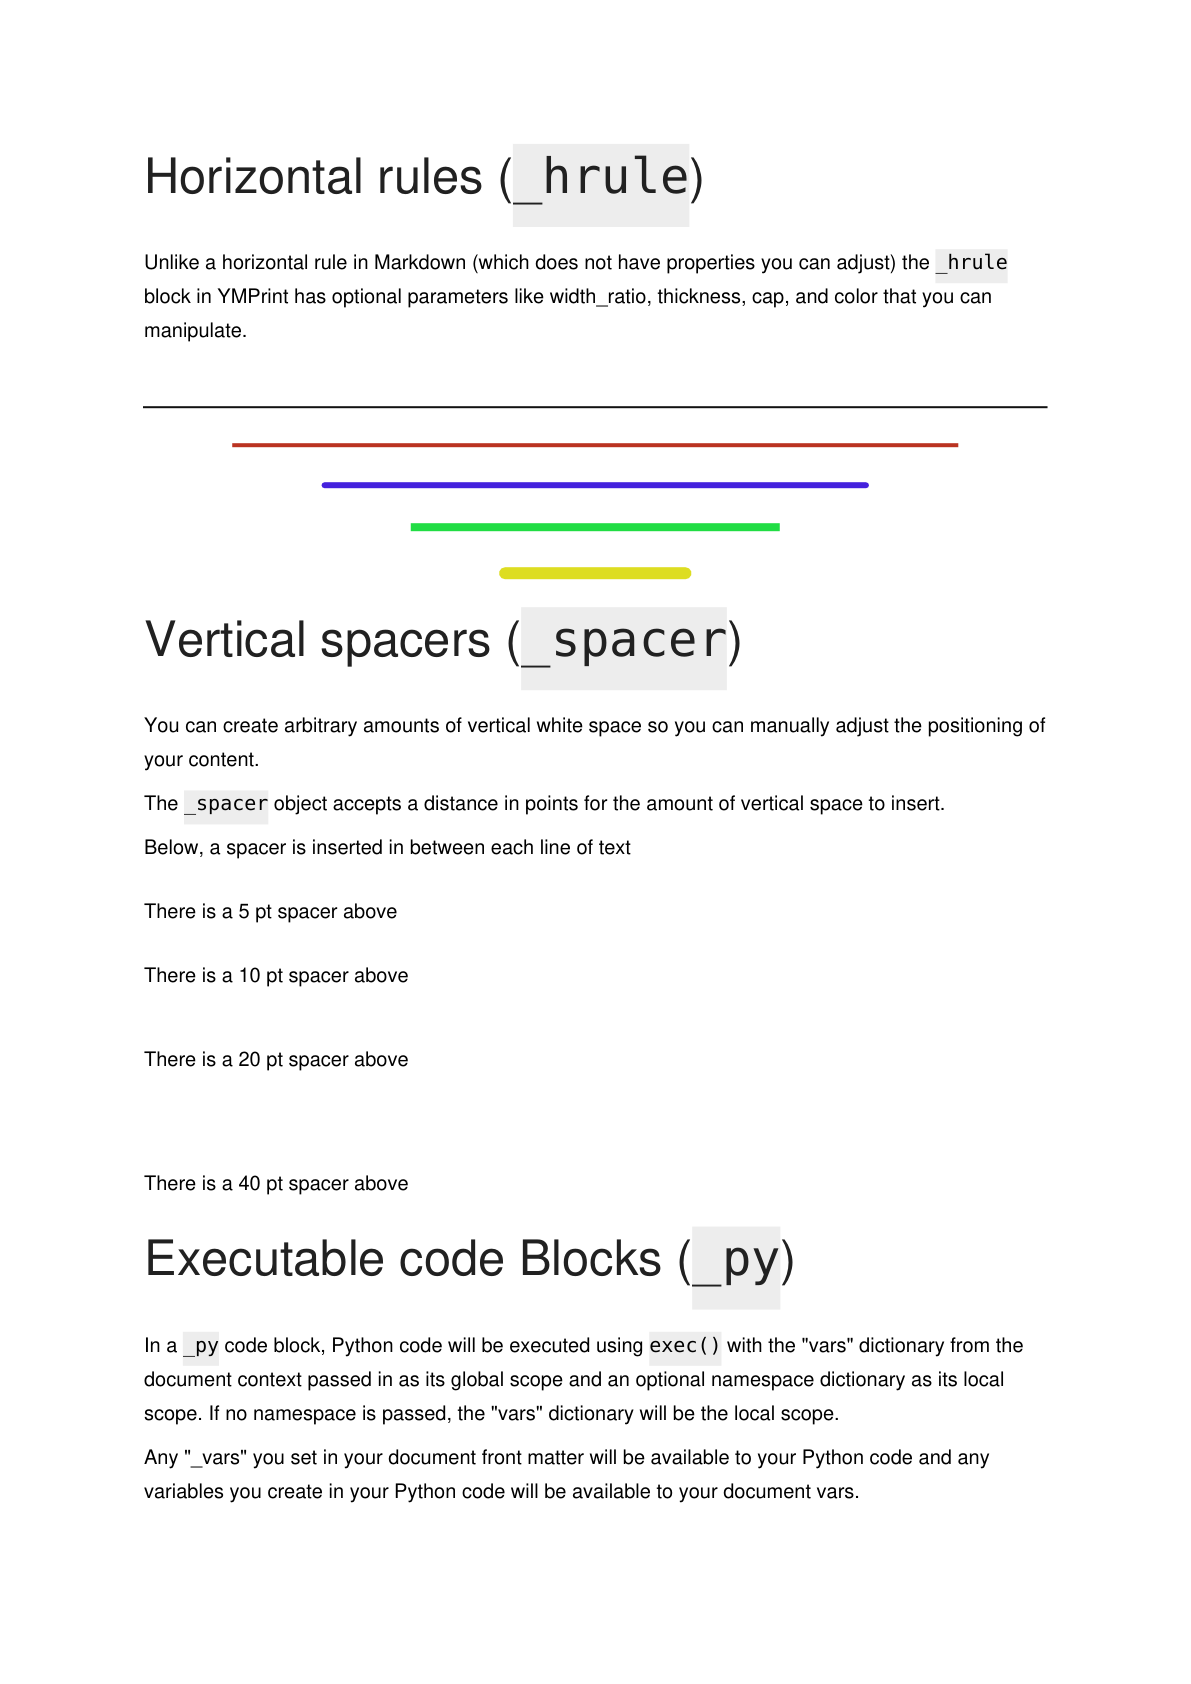
  - Horizontal rules (`_hrule`):
    - >
      Unlike a horizontal rule in Markdown (which does not have properties you can adjust)
      the `_hrule` block in YMPrint has optional parameters like width_ratio,
      thickness, cap, and color that you can manipulate.
    - _hrule_default: null
    - _hrule_red:
        width_ratio: 0.8
        thickness: 2
        color: "#bb3322"
    - _hrule_blue:
        width_ratio: 0.6
        thickness: 3
        color: "#4422dd"
        cap: round
    - _hrule_green:
        width_ratio: 0.4
        thickness: 4
        color: "#22dd44"
    - _hrule_yellow:
        width_ratio: 0.2
        thickness: 6
        color: "#dddd22"
        cap: round
  - Vertical spacers (`_spacer`):
    - >
      You can create arbitrary amounts of vertical white space so you can manually
      adjust the positioning of your content.

      The `_spacer` object accepts a distance in points for the amount of vertical
      space to insert.

      Below, a spacer is inserted in between each line of text
    - _spacer: 5
    - There is a 5 pt spacer above
    - _spacer: 10
    - There is a 10 pt spacer above
    - _spacer: 20
    - There is a 20 pt spacer above
    - _spacer: 40
    - There is a 40 pt spacer above
  - Executable code Blocks (`_py`):
    - >
      In a `_py` code block, Python code will be executed using `exec()` with the "vars"
      dictionary from the document context passed in as its global scope and an optional namespace
      dictionary as its local scope. If no namespace is passed, the "vars" dictionary will be the local
      scope.

      Any "_vars" you set in your document
      front matter will be available to your Python code and any variables you create in your
      Python code will be available to your document vars.

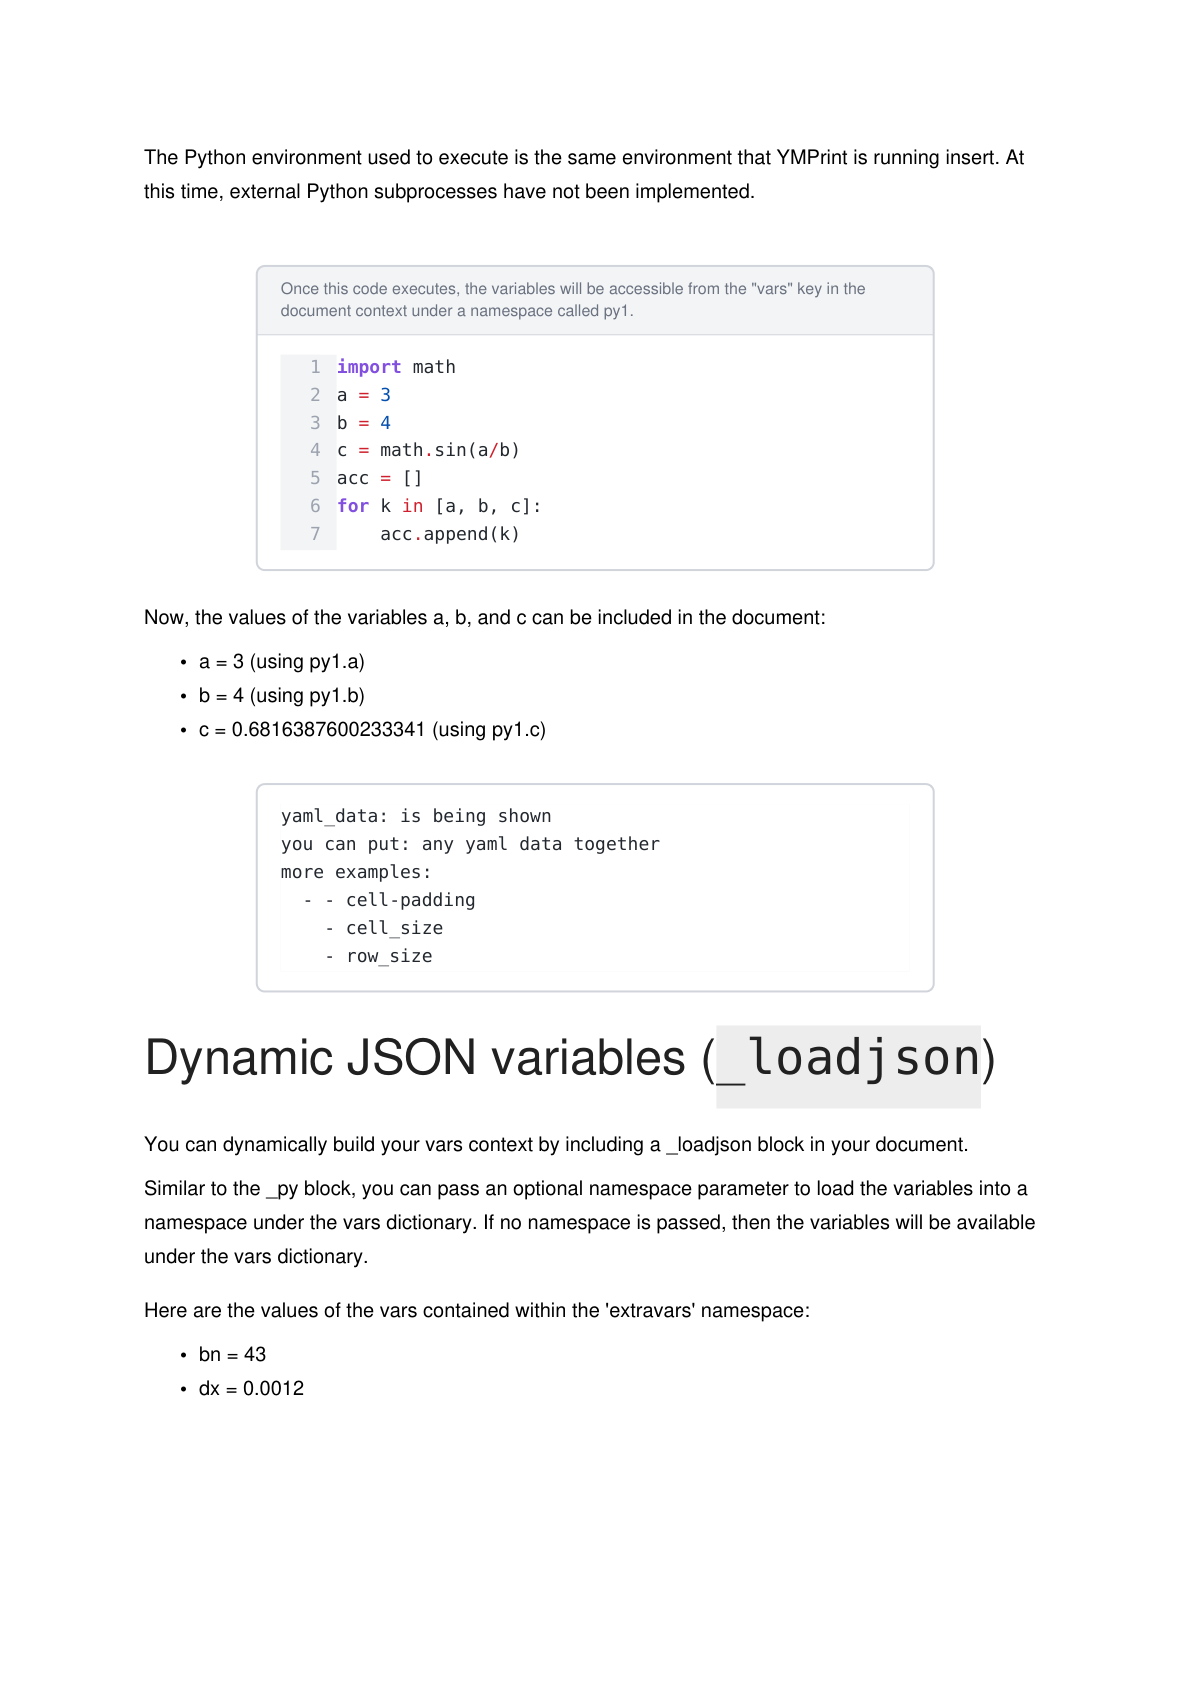
      The Python environment used to execute is the same environment that YMPrint is running insert.
      At this time, external Python subprocesses have not been implemented.

    - _py:
        echo: true
        caption: >
          Once this code executes, the variables will be accessible from the "vars" key in the document context under
          a namespace called py1.
        line_numbers: true
        namespace: py1
        source: |
          import math
          a = 3
          b = 4
          c = math.sin(a/b)
          acc = []
          for k in [a, b, c]:
              acc.append(k)
    - "Now, the values of the variables a, b, and c can be included in the document:"
    - _ul:
        - a = {{py1.a}} (using py1.a)
        - b = {{py1.b}} (using py1.b)
        - c = {{py1.c}} (using py1.c)
  - _code:
      source: |
        yaml_data: is being shown
        you can put: any yaml data together
        more examples:
          - - cell-padding
            - cell_size
            - row_size
  - Dynamic JSON variables (`_loadjson`):
    - >
      You can dynamically build your vars context by including a _loadjson block in your
      document.

      Similar to the _py block, you can pass an optional namespace parameter to load the
      variables into a namespace under the vars dictionary. If no namespace is passed,
      then the variables will be available under the vars dictionary.
    - _loadjson:
        path: extra_vars.json
        namespace: extra_vars
    - "Here are the values of the vars contained within the 'extravars' namespace:"
    - _ul:
        - bn = {{extra_vars.bn}}
        - dx = {{extra_vars.dx}}
Page 1 — images & admonitions
Page 2 — quotes, rules & spacers
Page 3 — executable Python
Page 4 — code & JSON variables